The first part of the exercise required between four and six photographs which are deliberately lighter or darker than average and to say why (I took eight in the end that I have used - I enjoyed this exercise!). On the day that I shot these photos, the lighting was very dark with snow filled clouds blocking out most of the light to the point that there was no shadow effect. With snow on the ground and the same colour as the sky, this gave me a useful opportunity to investigate whether it was better to over expose snow (as I had previously heard was the right thing to do) or underexpose. As I found, it depended on whether I wanted to brighten up the image to make the scene lighter, or to darken it and make it more gloomy. As the light was so awful, my ISO was set to 800 for the whole day to give me faster shutter speeds.
My first picture is the view across the common near my house in Feltham with the Young Offenders' Institute visible on the horizon: I deliberately underexposed this shot to make the scene darker and more
gloomy than it really was on the day. You can see the weight of the
snow clouds hanging over the Institute. This was shot with a
wide-angled lens at 24 mm, ISO 800, 1/1000s, f-9.5, making it -1.0EV.
My second shot was taken roughly from the same place, but this time looking back towards the estate where I live. I wanted to make this shot look a bit brighter than it was on the day to make the brick work stand out against the sky. I couldn't make it too bright as that would have over-exposed the snow, at this exposure, you can see the difference between the snow on the roofs and the sky. This was shot with a wide-angled lens at 24 mm, ISO 800, 1/350s, f-9.5, making it +0.5EV.
My third shot was taken again, roughly from the same place, but this time looking west towards the airport. I wanted to capture detail in the snow, so I overexposed this shot more than the previous one and excluded much of the sky to reduce the light coming in. Again, this was shot with a
wide-angled lens at 24 mm, ISO 800, 1/180s, f-9.5, making it +1.0EV.
The next picture was taken looking into a timber yard. The challenge here was how to cope with the dark wood in the dark lighting conditions. I wanted to brighten up the wood without brightening up the snow too much and risk losing definition of the roofs against the sky (there was some brightness in the sky in this direction). Still using a wide-angle lens at ISO 800 and f/9.5, but with a focal length of 10mm and 1/350s, the result was +0.5EV. You can see some definition in the wood and snow but without too much brightness.
My fifth picture included some colour. This was taken at the front entrance of the Young Offender's Institute. The red stands out against the bland surroundings however, I found that I had to over expose the image to make the red close to the original. Again with a wide-angled lens at ISO 800 and 10mm focal length, f/9.5 and 1/180s. The shot was +0.5EV.
More colour: in my sixth picture, I found some bright green against the snow and grey sky. I found I had to over expose this more than the previous one to get the green close to its real life colour. This also gave me some more definition in the snow on the bridge. Still with a wide-angled lens at ISO 800 and 11mm focal length, f/9.5 and 1/180s. The shot was +1.0EV.

I then headed off into London for the afternoon. Unfortunatley, by the time I got there, the light was so awful everything needed brightening up, so I opted for an indoor experiment in the Tate Modern. This part of the building was quite dark, but with bright light interacting. The challenge here was to get enough light to capture the scene and reflections, without blowing out the lights themselves. I had to drop my aperture from f/9.5 to f6/7 in order to get some shutter speed that I could handle hand-held. I didn't want to widen the aperture any further as I wanted to keep the detail in the distance. The image is slightly blurred as you would expect. I took this at ISO 800, 24 mm focal length (wide-angled), f/6.7 and 1/8s making it +0.5EV.

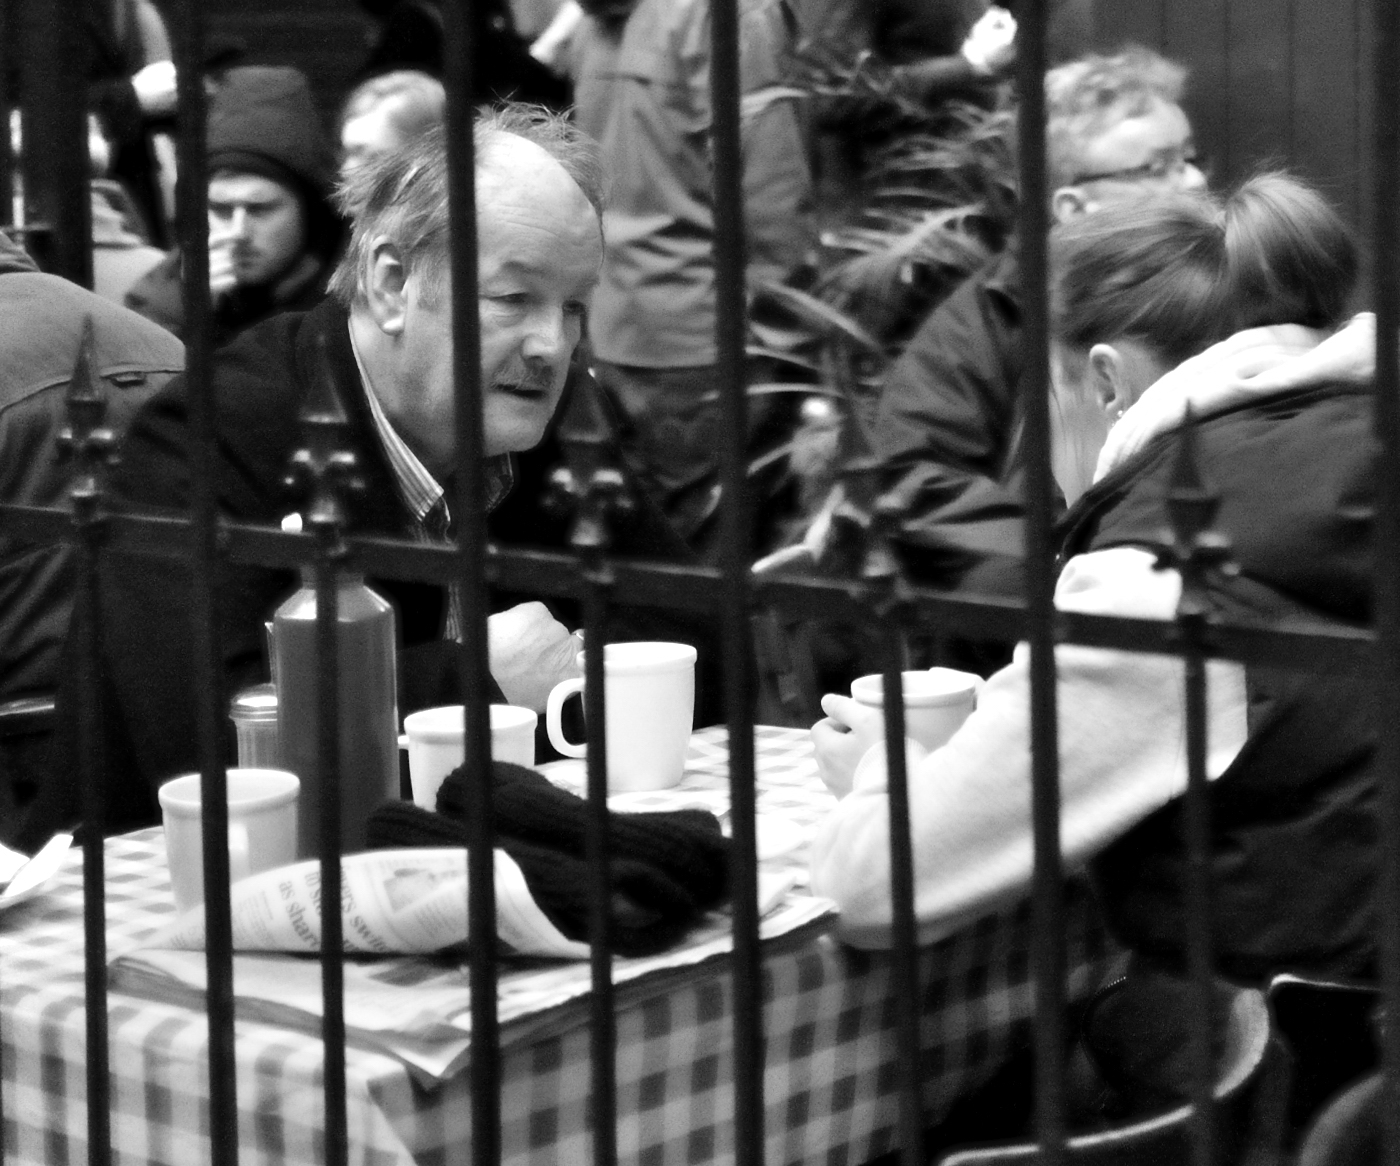
My final image of the day for this part of the exercise was taken with a prime lens (the first one I have used from this lens!). This is a faster lens than my wide-angled lens so it copes better with darker surroundings. I stumbled across this busker in a tunnel along the South Bank; the tunnel was quite bright with the high lights, and knowing that my lens would cope well with the light, I underexposed the image as I didn't want those lights to be completely blown out. I am pleased with the blur of the cellist's hand and the retention of some of the detail of all the dark clothing, but I would like to have another go at this with a tripod, a wider aperture and a slower shutter speed. This was shot at ISO 800, with a 35mm focal length, f/6.7, 1/45s, making the shot -0.5EV.

The second part of the exercise required photographing a subject several times at different exposures in order to determine which is the best exposure. I decided to fix the ISO and aperture, as I was photographing landscapes and wanted to keep the detail in the background, and so varied shutter speed to vary the exposure. All the images shot here were using Matrix metering (Nikon).
1. Mountain at the end of my street
This is a view that I'm deeply attached to; on a clear day it's amazing. Unfortunately today was not particulary clear and there was a bit of white-out where the horizon meets the sky with the snow.
 |
| ISO 800 1/250s f/13 |
This is the average exposure, which on a bright day would have been fine. Here it seems a little gloomy and despite the more narrow aperture, the detail of the mountain is lost.
 |
| ISO 800 1/350s f/13 |
A slightly faster shutter speed, and the sky is loking a bit better with a bit more detail in the horizon; the street however is looking a bit more gloomy.
 |
| ISO 800 1/500s f/13 |
Shutter speed faster still and the sky looking even better with more definition between the horizon and the sky; however the street view hasn't worked at all.
 |
| ISO 800 1/180s f/13 |
At the slightly slower shutter speed, the picture is improving; although detail of the horizon is becoming lost, the scene is becoming more solid.
 |
| ISO 800 1/125s f/13 |
This is probably the photograph that works the best in these conditions;
although there is less detail in the background with the mountains and
the sky, the detail of the street is visible, and the mind understands
that the background is snowy and so detail is lost.
Therefore, this shot of a dark foreground and a brighter background, has worked better being one stop overexposed in order to retain the detail of the foreground. This however relies on the audience accepting that some of the detail of the background is lost. Ideally this is a photograph which works better on a bright day in which there is less tension between foreground and background.
2. Derwent Water
 |
| ISO 800 1/750s f/13 |
This is the average photograph, with less issues to resolve than the
previous. At the time of shooting this I was lucky that the light was
good. There is nice shadow in the foreground and good detail of the the
treetops and mountain tops.
 |
| ISO 800 1/1000s f/13 |
At half a stop underexposed, the scene improves; the dark bits are slightly darker but the detail is still retained.
 |
| ISO 800 1/1500s f/13 |
Half a stop again underexposed, and there is more detail in the sky but detail in the fore and mid-ground still retained.
 |
| ISO 800 1/500s f/13 |
 |
| ISO 800 1/350s f/13 |
Half a stop over exposed and the photogrpah has become weaker; there is less definition in the snow and horizon.
Half a stop over exposed again, and the photogrpah has become weaker; there is even less definition in the snow and horizon and the whole scene is looking a bit washed out.
In this case, because of the good light, the balance of snow and water, the scene worked better being underexposed.
3. Derwent Ducks
 |
| ISO 800 1/180s f/13 |
With this scene, I thought the dark foreground and bright background, like the street scene above, would be difficult to resolve. In particular I wanted the ducks to stand out against the grey paving. This is the average exposure although the foreground has worked quite well, the clouds in the background are a bit overblown.
 |
| ISO 800 1/250s f/13 |
At half a stop under exposed, with a slightly faster shutter speed, the detail of the sky becomes clearer and less blwon out, while the detail in the foreground is retained. The dark patches in the car and the jetty are becoming a bit dark though so I wouldn't want to under expose any further.
 |
| ISO 800 1/350s f/13 |
Even better sky, but some detail now in the foreground, particularly around the cars and trees is lost.
 |
| ISO 800 1/125s f/13 |
Half a stop over exposed and the picture is not good; the sky is now blown out.
 |
| ISO 800 1/90s f/13 |
At one stop over exposed, the sky is even further blown out.
In this case, the image that worked the best was the one that was half a stop under exposed; this shot managed to add definition to the sky without taking away detail from the foreground.
4. Castle Crag from Friars Crag
I love this view: Castle Crag is the small pyramid shape hill in the centre of the horizon. It qualifies as a Wainright, but does not meet the requirements necessary to be classified as a mountain (although when you climb it it is exhausting!). It is also partly man made from the spoils of slate mining. The views from this dimunitive summit along the Borrowdale Valley are spectacular!
 |
| ISO 800 1/2000s f/13 |
 |
| ISO 800 1/3000s f/13 |
This is the average exposure; I think it works quite well; there is sufficient detail in the horizon and the clouds look fairly menacing, although there is a blown out patch in the sky towards the left.
 |
| ISO 800 1/4000s f/13 |
 |
| ISO 800 1/1500s f/13 |
 |
| ISO 800 1/1000s f/13 |
As above, but the sky is slightly more menacing!
As above, but an even more menacing sky!
In the underexposed range, the sky is not as effective.
As above, and even less effective.
With this scene, I like the underexposed images the best. In the image that is one stop underexposed, the scenery and sky is the most dramatic. This is helped by the monochrome aspects and tonal range that the underexposure exaggarates.
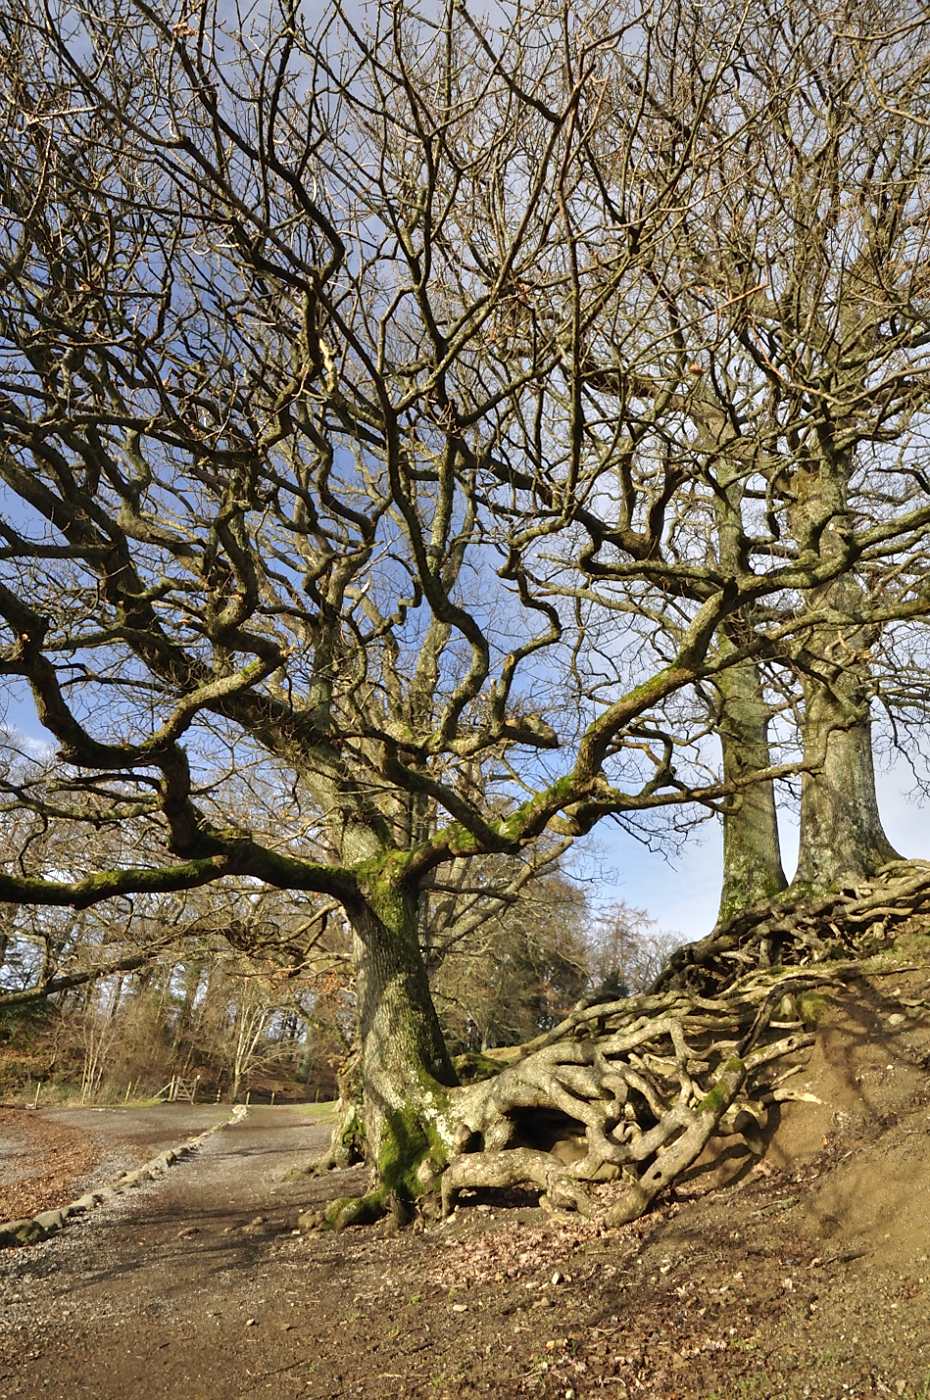
5. Tree Roots
There are some trees along the shores of Derwent Water with the most incredible roots; in Winter the trees look like they are double ended! In these shots, the challenge was to retain the details and contrast of the shadows caused by the roots. I used a polariser for these images.
 |
| ISO 800 1/180s f/13 |
Average exposure: this is the image that works the best. The shadows and dark patches between the roots are visible, without losing too much detail.
 |
| ISO 800 1/250s f/13 |
The half a stop under exposed and the image is starting to not work well; the dark patches are a bit too dark.
 |
| ISO 800 1/350s f/13 |
Half a stop again, and the image is too underexposed.
 |
| ISO 800 1/125s f/13 |
Half a stop over exposed and the image is starting to look a bit bleached.
 |
| ISO 800 1/90s f/13 |
A full stop overexposed and the image is too bright.
6. Old Tree
I have photographed this tree before on a very bright sunny winter day, and I got a fantastic result with a polariser, however, I didn't compose the shot very well and chopped off some of the branches. I was careful this time to make sure all the tips were tucked in! Unfortunately the sky was not so stunning on this occasion.
 |
| ISO 800 1/500s f/13 |
 |
| ISO 800 1/750s f/13 |
Average exposure; image is adequately exposed with sufficient detail in the sky and darker patches.
 |
| ISO 800 1/1000s f/13 |
 |
| ISO 800 1/350s f/13 |
 |
| ISO 800 1/250s f/13 |
Half a stop under exposed; sky is improved but detail is lost in the horizon and foreground.
As above, but more exaggarated.
Half a stop overexposed; more detail in the foliage is picked up.
A full stop overexposed and some bleaching is starting to occur.
It's hard to say which exposure has worked the best; I think that ultimately the average exposure has as it is the only image with the correct balance between the sky and the darker patches.
7. Keswick Market
I took an extra round of photos for this exercise, as I wanted to try a crowded street scene as well as the traditional landscapes. The challenge here was to balance the sky with the darker detail of the market stalls. At this stage, I used a wider aperture as the light was darker than it had been earlier and so I wanted to retain the shutter speed at the brighter exposures.
 |
| ISO 800 1/500s f/11 |
Average exposure: sufficient detail in the market stalls but the sky is a bit bright.
 |
| ISO 800 1/750s f/11 |
The detail of the sky is improving, but the detail in the market stalls is now too dark.
 |
| ISO 800 1/1000s f/11 |
Even better sky detail, but definately too dark now in the foreground.
 |
| ISO 800 1/350s f/11 |
Good foreground detail but sky starting to look blown out now.
 |
| ISO 800 1/250s f/11 |
Even better foreground detail but sky now completely blown out.
For this set of images, the problem hasn't been resolved. The sky is best in the shot that is one stop under exposed, and the foreground is better in the shot that is one stop over exposed. So to take such an image on this day, perhaps several images would have had to have been superimposed (HDR?) - but this would have presented a problem with people walking in and out of the frame. Perhaps using an N-Grad filter to darken the sky and then over exposing would have worked?
All in all, under, average or over exposure depends on the conditions and subject. Skies respond well to under exposure and detailed foregrounds seem to respond to over exposure.