I really don't know what to say about this - I have no idea if I have fulfilled the brief or not. I've never done a still life study like this before and I'm a little surprised and pleased that I finished it! As for the quality of outcome, I think some of the photos demonstrate a good outcome, in particular Shape 1 and Shape 2, and Shape, Form, Texture and Colour.
I think I have demonstrated some but not all of the technical skills learnt during the assignement. I didn't, for instance, use diffused lighting in the end and to be honest, I hadn't finished all the exercises prior to shooting the assignment, being in too much of a hurry to get going with this. I generally found I got better results using harsh lighting. The shot that was the hardest to achieve was Texture 3 - to get sufficient lighting into the back of the crystal hollow to capture the texture all the way back, and also capture the crystals on the edge, took a quite a while and a lot of different positions (both me and the lights).
I think this is my most creative assignment to-date; particularly the constructed shot Texture 1 and Shape, Form, Texture and Colour.
Looking at other students' work, I think I have used context fairly effectively with this assignement; I tried to vary my surroundings whereas I noticed that other students hadn't done this. Hopefully that is the right approach!
The weakest shot in all of these is Form 1; I don't find this a particularly pleasing shot - it can't be used as an image in its own right, although it does show the form of the body of the geode.
My favourite image is Shape, Form, Texture and Colour, because this was experimental and I hadn't expected to capture all the criteria in one shot. I also really enjoyed shooting Texture 1 and found this spawned other ideas to use on other occasions.
Thursday 28 March 2013
Tuesday 26 March 2013
Preparation for Assignment 5
Ideas:
- Skomer Island - Puffin workshop
- Keswick Beer Festival
- Fix the Fells
I decided to start with my Fix the Fells idea, as this is closest to my home in Cumbria, and would be the most challenging in terms of conditions.
March 25th
I met Tanya Oliver (author of "From High Heels to High Hills") who works for the National Trust and co-ordinates the Fix the Fells activities.

My plan is to capture a start to finish Fix the Fells project, from the helicopter dropping the stones off to the volunteers having a pint at the end of a hard day's labour. The motivation behind this idea is because I have seen and side-stepped volunteers working on a narrow ridge at altitude on Helvellyn Lower Man in dreadful weather, plus as a keen fell-walker (as keen as you can be at my level of fitness....), I benefit on a regular basis from the repair work these kind people do to the paths, not to mention the protection against erosion that everyone benefits from.
So I met with Tanya to discuss ideas:
- helicopter dropping stones - one drop a year - coming up soon
- boulders in large bags
- volunteers digging and repairing paths
- using sheep fleeces to line under the paths
- planning meeting
- meeting a couple of volunteers
- manual labour at altitude
- any interaction with passers-by (human or four-legged)
- the final "fixed fell"
- pint of the real stuff at the end of the day
Now waiting for Tanya to confirm date of helicopter drop off and projects that are available during the time I am in the Lake District.
Countdown to improving fitness so as not to be embarrassed on shooting days has begun....
March 27th
Quick research on the Internet for tips on snapping helicopters:
- use as slow a shutter speed as poss for blade movement - 1/100s or slower
- use as low an ISO as poss - 100 - to ensure body crisp and bright
- use centre-weighted metering to avoid camera taking in too much sky reading and compensating - make body bright and shiny
- consider overexposing by half to two-thirds of a stop
Question remains - what lens?? Prime, wide-angled, zoom or fish-eye? Would I have time to experiment? How long would the helicopter hover in one place for? How far into the mountains would I be lugging my kit? I like the clarity the prime gives but a fish eye could be fun? Could I get to the drop zone the day before to practise the scene?
April 19th and 20th
Helicopter days :-)
I was incredibly lucky to be able to catch the helicopter drops on the two days I had off work - previously they had been cancelled due to bad weather conditions, and I would have missed them if they had gone ahead as scheduled!
The first day was in the vicinity of Blea Tarn and the second around Fairfield summit. Both very scenic - both delivered far more than I was expecting! And I was lucky enough to be able to go up in the helicopter on the 20th to the path leading up to Fairfield :-) See my work on a narrative picture essay for more info on this!
The shooting itself was difficult - the helicopter was very dark and did not always show up very well against the purple/grey patches on the mountains. In addition, typical of the lake district, the light conditions were very variable, so things kept changing all the time. I also forgot all the tips I had looked up above, so I didn't manage to work out on the day how to get the best out of the helicopter, apart from getting the right shutter speed.
All in all though, two fantastic days, and out of the 2000 pictures I took, I definitely have a couple that I can use for the helicopter dropping off the bags, and the bags alongside the scar.
The next step is to meet up with some volunteers repairing the paths for the rest of my planned shots.
June 12th
Unfortunately, I've had to abandon my fix the fells project. The work I wanted to photograph wasn't available on the days that I had off work, so a lesson learnt here about planning! This is a shame - I got some great photos on the helicopter days, but fortunately I have been able to use them in other exercises. This is my favourite shot of the lot, although it needs a bit more processing to darken the top of the sky:

I tried my back up plan of making a narrative out of the Keswick Beer Festival on Saturday June 9th - and took a ton of photos there too. Again got some good shots, but this doesn't hold together well as a narrative. What I do have is a funny sequence that would make a great "mini-movie" in my "This is England" series, so watch this space!
So my next idea is to make a narrative around my forth coming wildlife photography workshop to Skomer Island in Wales on June 19th. This would be hard to prepare, and I have learnt from relying on my Norfolk trip last year for the Elements of Design Assignment Two, that it is a risk when you can't necessarily go back to reshoot the same image if something isn't quite right. But perhaps this is something all photographers have to deal with? I will probably take 1000s on the day, so hopefully, safety in numbers. Anyway, not really knowing the exact itinerary of the day makes it hard to predict how a narrative might piece together, so I have put together a rough wishlist, rather than a plan.
I also consulted Michael Freeman: The Photographer's Story for some tips on putting a narrative together. Reading through Freeman's definitions of kinds of stories, this would be a location/activity story (location being Skomer Island - activity being learning wildlife photography) and also a journey - to and from the island and my own journey in photography. The workshop is being led by Welsh photographer Andy Davies:


I imagine my narrative will be something like (following Freeman's Three + One theory from page 22):
Opener: meeting Andy, leaving the harbour, interaction with captain?, landscape of Skomer Island
Body: techniques covered during workshop, approaching animals, reviewing images
Closer: leaving the island, back on mainland
Key shot: much coveted picture of puffin with sand eels in beak
19th June
The day was a great success :-) Andy was brilliant - we had fantastic weather and the puffins were amazing. I had around 800 photos to look through. The difficulties were that the sun was so strong, there was a risk of over-exposing and getting burn out on the white puffin feathers. To resolve that I shot and half a stop under-exposed, which in processing I often had to change back to zero, but it minimized the burn out.
29th and 30th June
Putting together the narrative was harder than I thought. To being with, I had a few opening and closing shots, and masses of pictures of puffins. I had to think through what we had learnt on the workshop and what I had learnt about puffins and try to make them gel as an article. Also, my opening shots were not that interesting and my closing shots were taken into the sun and so plagued with glare....
My initial selection of potential photographs was 35; I managed to get this down to around 20 and put them together into a powerpoint presentation, only to re-read the instructions and realised I had to make a magazine article specifically. I then searched through all the templates on my laptop and also consulted other student blogs to see what they had done. I particularly liked Simon Lawrance's example of Ploughing Match. I eventually found a template that I could use but chose to delete the Latin blah blah blah, inserting my own text based on what I had learnt and found out on the day. I then had to get my number of photos down from 20 odd to 12. This was hard, and particularly as I was so attached to the puffins, I wanted to include them all. Having learnt from previous assignments that I needed to be more objective, I thought very carefully about each picture, what they added to the narrative and how they were composed. I tried to link them back to the Elements of Design exercises and assignment, and to be very strict about the quality of the photo.
When I was putting my narrative together, I also had a look at BBC Wildlife Magazine and National Geographic for some ideas.
Both magazines had dramatic captivating cover photos (they always do - National Geographic is known for this). This is the cover for BBC Wildlife Magazine for Summer 2013:
This made me think about using a portrait for mine. Following the design used by these magazines for their articles was not so simple. They tended to go for double page landscape layouts, and National Geographic in particular uses fold-outs to make its photographs triple page. BBC Wildlife did not use the structure described by Freeman, and National Geographic contained far more text than I was intending to use. In the end, I tried to follow the 3+1 structure promoted by Freeman.
I am pleased with the results, and hope I can go back one day!
Here three of the many pictures from the cutting room floor; these were excluded because they did not fit into my narrative sequence:


- Skomer Island - Puffin workshop
- Keswick Beer Festival
- Fix the Fells
I decided to start with my Fix the Fells idea, as this is closest to my home in Cumbria, and would be the most challenging in terms of conditions.
March 25th
I met Tanya Oliver (author of "From High Heels to High Hills") who works for the National Trust and co-ordinates the Fix the Fells activities.

My plan is to capture a start to finish Fix the Fells project, from the helicopter dropping the stones off to the volunteers having a pint at the end of a hard day's labour. The motivation behind this idea is because I have seen and side-stepped volunteers working on a narrow ridge at altitude on Helvellyn Lower Man in dreadful weather, plus as a keen fell-walker (as keen as you can be at my level of fitness....), I benefit on a regular basis from the repair work these kind people do to the paths, not to mention the protection against erosion that everyone benefits from.
So I met with Tanya to discuss ideas:
- helicopter dropping stones - one drop a year - coming up soon
- boulders in large bags
- volunteers digging and repairing paths
- using sheep fleeces to line under the paths
- planning meeting
- meeting a couple of volunteers
- manual labour at altitude
- any interaction with passers-by (human or four-legged)
- the final "fixed fell"
- pint of the real stuff at the end of the day
Now waiting for Tanya to confirm date of helicopter drop off and projects that are available during the time I am in the Lake District.
Countdown to improving fitness so as not to be embarrassed on shooting days has begun....
March 27th
Quick research on the Internet for tips on snapping helicopters:
- use as slow a shutter speed as poss for blade movement - 1/100s or slower
- use as low an ISO as poss - 100 - to ensure body crisp and bright
- use centre-weighted metering to avoid camera taking in too much sky reading and compensating - make body bright and shiny
- consider overexposing by half to two-thirds of a stop
Question remains - what lens?? Prime, wide-angled, zoom or fish-eye? Would I have time to experiment? How long would the helicopter hover in one place for? How far into the mountains would I be lugging my kit? I like the clarity the prime gives but a fish eye could be fun? Could I get to the drop zone the day before to practise the scene?
April 19th and 20th
Helicopter days :-)
I was incredibly lucky to be able to catch the helicopter drops on the two days I had off work - previously they had been cancelled due to bad weather conditions, and I would have missed them if they had gone ahead as scheduled!
The first day was in the vicinity of Blea Tarn and the second around Fairfield summit. Both very scenic - both delivered far more than I was expecting! And I was lucky enough to be able to go up in the helicopter on the 20th to the path leading up to Fairfield :-) See my work on a narrative picture essay for more info on this!
The shooting itself was difficult - the helicopter was very dark and did not always show up very well against the purple/grey patches on the mountains. In addition, typical of the lake district, the light conditions were very variable, so things kept changing all the time. I also forgot all the tips I had looked up above, so I didn't manage to work out on the day how to get the best out of the helicopter, apart from getting the right shutter speed.
All in all though, two fantastic days, and out of the 2000 pictures I took, I definitely have a couple that I can use for the helicopter dropping off the bags, and the bags alongside the scar.
The next step is to meet up with some volunteers repairing the paths for the rest of my planned shots.
June 12th
Unfortunately, I've had to abandon my fix the fells project. The work I wanted to photograph wasn't available on the days that I had off work, so a lesson learnt here about planning! This is a shame - I got some great photos on the helicopter days, but fortunately I have been able to use them in other exercises. This is my favourite shot of the lot, although it needs a bit more processing to darken the top of the sky:

I tried my back up plan of making a narrative out of the Keswick Beer Festival on Saturday June 9th - and took a ton of photos there too. Again got some good shots, but this doesn't hold together well as a narrative. What I do have is a funny sequence that would make a great "mini-movie" in my "This is England" series, so watch this space!
So my next idea is to make a narrative around my forth coming wildlife photography workshop to Skomer Island in Wales on June 19th. This would be hard to prepare, and I have learnt from relying on my Norfolk trip last year for the Elements of Design Assignment Two, that it is a risk when you can't necessarily go back to reshoot the same image if something isn't quite right. But perhaps this is something all photographers have to deal with? I will probably take 1000s on the day, so hopefully, safety in numbers. Anyway, not really knowing the exact itinerary of the day makes it hard to predict how a narrative might piece together, so I have put together a rough wishlist, rather than a plan.
I also consulted Michael Freeman: The Photographer's Story for some tips on putting a narrative together. Reading through Freeman's definitions of kinds of stories, this would be a location/activity story (location being Skomer Island - activity being learning wildlife photography) and also a journey - to and from the island and my own journey in photography. The workshop is being led by Welsh photographer Andy Davies:


I imagine my narrative will be something like (following Freeman's Three + One theory from page 22):
Opener: meeting Andy, leaving the harbour, interaction with captain?, landscape of Skomer Island
Body: techniques covered during workshop, approaching animals, reviewing images
Closer: leaving the island, back on mainland
Key shot: much coveted picture of puffin with sand eels in beak
19th June
The day was a great success :-) Andy was brilliant - we had fantastic weather and the puffins were amazing. I had around 800 photos to look through. The difficulties were that the sun was so strong, there was a risk of over-exposing and getting burn out on the white puffin feathers. To resolve that I shot and half a stop under-exposed, which in processing I often had to change back to zero, but it minimized the burn out.
29th and 30th June
Putting together the narrative was harder than I thought. To being with, I had a few opening and closing shots, and masses of pictures of puffins. I had to think through what we had learnt on the workshop and what I had learnt about puffins and try to make them gel as an article. Also, my opening shots were not that interesting and my closing shots were taken into the sun and so plagued with glare....
My initial selection of potential photographs was 35; I managed to get this down to around 20 and put them together into a powerpoint presentation, only to re-read the instructions and realised I had to make a magazine article specifically. I then searched through all the templates on my laptop and also consulted other student blogs to see what they had done. I particularly liked Simon Lawrance's example of Ploughing Match. I eventually found a template that I could use but chose to delete the Latin blah blah blah, inserting my own text based on what I had learnt and found out on the day. I then had to get my number of photos down from 20 odd to 12. This was hard, and particularly as I was so attached to the puffins, I wanted to include them all. Having learnt from previous assignments that I needed to be more objective, I thought very carefully about each picture, what they added to the narrative and how they were composed. I tried to link them back to the Elements of Design exercises and assignment, and to be very strict about the quality of the photo.
When I was putting my narrative together, I also had a look at BBC Wildlife Magazine and National Geographic for some ideas.
Both magazines had dramatic captivating cover photos (they always do - National Geographic is known for this). This is the cover for BBC Wildlife Magazine for Summer 2013:
 |
| BBC Wildlife Magazine - cover photograph - Summer 2013 - taken by Dr Maurice Hornocker |
I am pleased with the results, and hope I can go back one day!
Here three of the many pictures from the cutting room floor; these were excluded because they did not fit into my narrative sequence:


Sunday 24 March 2013
Assignment Four - Applying Lighting Techniques
 |
| Colour 1 |
 |
| Form 1 |
 |
| Shape 1 |
 |
| Shape 2 |
 |
| Texture 1 |
 |
| Texture 2 |
 |
| Texture 3 |
 |
| Shape, Form, Texture, Colour |
Saturday 23 March 2013
Light, Science & Magic by Hunter, Biver and Fuqua
In preparation for Assignment Four, I read Light, Science & Magic - An Introduction to Photographic Lighting - by Hunter, Biver and Fuqua - Fourth Edition.
At first I wasn't too interested in the subject matter, being more a devotee of outdoors rather than still life photography, but as I progressed through the book, and understood its relevance to the assignment and how it could help me, I became more interested in it. I still can't see myself investing in lighting equipment or practising some of the techniques described, but I think the theory will help me understand how the light outside works.
Learning points from this book are:
Light - contrast
- small light sources produce hard-edged shadows
- large light source produces softer shadows
- small light source produces small, hard highlights
- large light source produces large highlights
- refraction bends light (e.g. a glass photographed through another glass object)
- diffuse reflection reflects light equally - whatever angle the light source
- use large light souce to fill family of angles (equal reflections e.g. CDs)
- polariser blocks direct reflection
Texture
- experiment with angled light and distance to control reflection from a shiny surface
- small light at a low angle with camera face on will produce contrasting highlights and shadows to reveal texture in medium toned and light toned subjects - so light skims surface
- large light at 45 degree angle with camera at other 45 degree angle to produce texture in dark object
- glossy textures - use combinations of diffuse and direct lighting at an angle to create contrast
- a dark background will emphasis a glossy surface
Shape and Contour
- depth is achieved by camera position and distortion of angles - converging parallel lines
- tonal variation will also create depth
- backlighting will emphasise shape - but will create a silhouette
- front lighting will also emphasise shape
- side lighting will emphasise form but might partially conceal the subject in shadow and compete with the subject - but the tonal variation helps the brain perceive depth
- three-quarter lighting will emphasise form
- top lighting will also emphasise form but will create a small shadow base
- experiment with moving the position of the light nearer to and further away from the subject
- fill cards/reflector cards will soften shadows and light both sides of the subject
Metal
- various techniques described for photographing metal - depending on whether you want shiny or dull reflection (not relevant to my subject matter for Ass4)
Glass
- various techniques described for photographing glass - depending on whether you want shiny or dull reflection (not relevant to my subject matter for Ass4)
Portraiture
- lighting for portraiture described - again not relevant to me at the moment
Extremes
- lighting for extreme situations described - balancing act of curves (brightness vs exposure steps)
- overexposure elimates compression in shadows but results in too much highlight
- underexposure overcompresses shadows - too much darkness
- white on white scene - can either light subject to render background greyer or light background to render subject greyer- also consider use of reflectors, translucent backgrounds, black cards to change lighting conditions
- same with black on black - vary lighting techniques to emphasise the black elements
Travelling lights
- techniques described: bounce/strobe to get the best out of portraits
- fill flash to compensate for back lighting
Sunday 10 March 2013
Preparation for Assignment 4
Assignment 4 required an object that I could walk around and expose to different light effects. My first thought was Great Gable, one of the Lake District fells - 899m high, and from some perspectives pyramid shape and from others a large bulk. I had planned to walk the Gable Girdle and photograph it from different angles at different times of day to get the desired effects, silhouttes, rock textures and so on. Then my tutor advised me that it really needed to be a small household object that I could shine lights on - like in the exercises for section 4. :-( I like outdoors photography, not indoors.....
Anyway, toys back in the pram, I started to think about what I could use. I had a look at other students' blogs and saw a variety of subjects had been used including a teddy bear, a garden light, a mask, a nodding Churchill dog and a pig's head. Looking at these, helped me think about what I could use as an object.
My initial thought was to use a skull - it would have an interesting form, texture, and shape - I figured I could create some interesting effects with the eyes, and I would see if I could bring out any colour other than white. So I looked on ebay for a skull, and found I could buy a real human skull for about £250. This freaked me out......
I then thought about photographing my friend's stick insect called "Stump" - he ticked all the boxes - shape, form, texture, colour - and I had visions of macro photos, with shadows of legs reflected. In practise, the trial shots were fraught with difficulty: Stump would not keep still for one thing (aren't stick insects suppposed to pretend to be sticks?) and he kept marching towards me, which viewed through a macro lens was a little disturbing!

The other difficulty was the lighting. Stump was quite dark, as was the stick he was balancing on. Each time I tried to shine a light on him to get some shadow and contrast he walked off....

So I abandoned Stump, and turned to my friend's other pet, Harry. With Harry, I had the opposite problem: he kept turning around away from me and running into a corner squeaking. I was trying to use a fish-eye to enhance his lovely round form, but he didn't like it.

So, my next idea was a brightly coloured agate geode I saw in a shop in Keswick (why in Keswick - don't these belong in Dorset??). If couldn't go to the mountain, I would bring the mountain to me! So I bought my geode and started to think about what I could do with it. It has shape, form, colour, and texture - three different kinds of texture in fact - so hopefully this will serve me well.
Here is my trial shot with a single lamp from the side, showing its basic shape:

So object now chosen, I then started to think about what I needed to do to achieve the four criteria, using my knowledge gained from the coursework, what I had found out reading Light, Science & Magic by Hunter, Biver and Fuqua, and some other gems of inspiration gained from attending exhibitions and reading "Photography Monthly". At this point, having prevoiusly not wanted to do a still life set up, I was so motivated by my ideas, that I started shooting for the assignment, before I had finished all the exercises for section four!
Shape
My trial shot shows the basic shape quite well, so I decided to retain this idea, particularly as the flame-shape is replicated in the pattern of the agate. I also liked the shadow and the line of the white wall and the white table top, so remembering Ill Form and Void Full, I thought I would reshoot this, perhaps angle the geode slightly to create a bulky shape and try to create something similar using some paper to create some confusing planes (not sure that bit worked very well, but I did try......) and contrast between straight lines and the flame-shape of the geode - maybe I could exagerate the effect by using a wide-angled lens close up?? Would the shape be improved by using monochrome also?
After trying several options including using overhead lighting to eliminate shadow, I used a shot taken with a macro lens, enabling me to get close to the pattern, and naked side lighting, which created a matt surface, and converted the image to monochrome to remove the colour distraction. The shadow to the left side was surprisingly soft in the final version so I felt this was ok to leave in, as it added some slight anchoring and created a better image than the overhead lighting. After converting it to monochrome, I changed it back to colour, as in the end I preferred the colour version. See Shape 1.

I also wondered if I could create the effect of shape by using some backlighting; I wanted to see if I could create a silhoutte by putting a candle behind the geode and shooting the flat plane in darkness - perhaps using a tripod and remote control. In the end, I created a dark wigwam out of black card and shot handheld using a prime lens and underexposed by four stops and then three stops.

However, I wasn't entirely happy with these images. The light behind the rock wasn't strong enough to produce the desired silhoutte.


After thinking about this overnight, the next day was blessed with beautiful sunlight. So I placed the geode on the window sill, making the most of the sunlight (yes should have been out walking......) and using my prime lens, narrowed up the aperture to f/22 and underexposed by one stop. This exposure brought out the background detail and strengthened the colour in the background. See Shape 2.
Form
Because the geode has a flat plane, I imagined the best way to capture form would be to position the geode at an angle to the camera and to try using three-quarters raised lighting to try to capture the longest distance to the back of the geode and to see if I could extend the shadow beyond this point - so the light would have to be pointing towards the back of the geode.
I also thought I would convert to monochrome to get the full effect of form like I did with my image of Fleetwith Pike below taken last year:

Here is my set up for my first form shot showing a set up between three-quarters angled and over head lighting. In the end, I placed the geode flat plane down to make the most out of the curved body of the stone and converted to black and white to eliminate the distraction of colour. See Form 1.

My second attempt at a form shot happened by accident. I noticed that the sun was quite strong through my bedroom window so I placed my geode on the laundry basket and tried to capture some edge lighting using spot metering and under exposing. I was successful in getting the lighting around the form of the geode, but not in the execution of the photo; I was set to a very wide aperture and the camera focussed on the wicker not the geode...

This did however spark a new idea, which involved rolling around on my bedroom floor (much to the amusement of my dogs), moving my geode around trying to capture the sunlight in various places and underexposing by four stops and using the narrowest aperture possible, which got some pleasing results.
Here is one of my experimental shots:

But, see the final photograph: Shape, Form, Texture and Colour, for the version submitted.
Colour
As I had three textures to consider with the geode, and only one good colour - bright magenta - I considered various options for colour, but would decide afterwards which one had worked the best
My first thought was to try to create some bright pink bokeh making the most of the shiny surface. Remembering Creative Digital Photography by Chris Gatcum, I checked how to do this: wide aperture (can use my prime lens for this) and close camera, but for bokeh you need the light to be in the background and the geode would then block the light out....I figured I would try shining a light directly at the face of the geode and to see what happened - perhaps with the camera close up and a very wide aperture something interesting would happen...if that didn't work, I could also try a zoom burst - remembering that this is about light rather than gimmicks, I would be careful to make sure the light/exposure would render the colour as pink as possible. I knew from previous work on colour that slightly overexposing made the colour seem brighter to a point, and that under exposing would create stronger colours, but that I got the most accurate results by average exposure. I figured that perhaps half a stop over exposed would perhaps produce a good pink.
My other option for emphasing colour could be to vary the background. Again, using face on lighting to reflect as much pink as possible, I could use a black or white background to create absolute contrast, or use the opposite colour on the colour wheel for light - a sort of lime green would create contrast. I have a green "post-it" pad that would do the trick. Again - remembering that the exercise is about light, recalled the exercise on softening the light produced more even and brighter colour with diffused lighting and that from the lighting angle exercise, the better colours were produced from a high light pointing down.
Incidentally, something interesting happened when I was experimenting with the colour saturation on my software; I would really like to have used this but I cannot attribute this effect to lighting....:
I experimented for a while with zoom bursts and trying to place lighting behind the geode to get some pink lighting that would produce bokeh, but it was quite obvious very quickly that this wouldn't work; so I went back to trying to create the best pink using my lighting. The first shot I tried for my colour image was against some green "post-it" notes to achieve colour contrast, with the geode facing sideways to the window; I didn't like this image at all - it's too harsh and there is a black halo effect on one side.

My second attempt was much more successful. I wanted a bold colour, so I abandoned the diffused lighting idea and placed the spot table light directly in front of the geode with the light shining as high as possible in the face of the geode - to the naked eye this seemed to bring out the most of the colour. I underexposed the image by one stop to deepen the colours and changed the white balance to "lightbulb setting" to bring a bluer effect. I think the blue tint with the shadow provides a softer and more pleasing contrast than the harsh green. See Colour 1.

I also noticed that with the lights at certain angles, the little crystals inside the geode reflected pink light, however, as this shot is very similar to my texture shot, I decided against using it.


Texture
My geode has three textures, rough, smooth, and crystalline, so I wanted to use three of the eight photo options here, particularly as I only needed one for colour. With all options I would use a macro lens to really get the most out of the texture.
The body of the geode is rough like pumice stone and a pale mauvish pink. I knew from reading Light, Science and Magic that to get texture out of a paler surface you need a small light at a low angle to reveal texture, but I also wondered what would happen if I photographed the geode outside in the snow (unusual for March), hoping that the snow would reflect light at different angles, and added some little people to create the effect of climbers on a rock........

So, Sunday morning, nice light with moving clouds. light not too harsh, a trial shot indoors:

and off we went outside; only to find out that this was FRAUGHT WITH DANGER. For a start, the snow made the geode wet, and the geode made the snow pink, so this was not helping. Secondly my little people kept blowing off; one of which got lost in the snow and took a while to find :(
I did manage to get some texture though - you can see shading in the bigger holes - but this is helped enormously by the macro lens and the ability to shoot close up.

So, back inside the safety of the house, I had to rethink how I would set up the shot. I then remembered a photo I had previously taken of Derwent Water, when I was trying to learn misty water and negative space, and thought, that although the image hadn't worked very well in printing (overblown reflections), it would make a nice background for my scene.

I then positioned my geode and people in place and took a trial shot with the little people, while I was waiting for the geode to dry out.

Happy now that my idea would work, I set the shot up with side lighting trying different combinations of tabletop spotlight and an LED headlamp held in different places. I also knew from the trial shot that I needed to use a narrower aperture. This did however turn out to be harder than I thought. I found that to get texture in the bigger holes, I had to sacrifice texture across the surface, and vice versa. 138 pictures later... I finally settled on f/32, 4s and ISO 200 using a tripod with just the LED light held at about 45 degrees with the camera face on. See Texture 1.
This then spawned a further idea for a "most imaginative" competition coming up later in the year....just waiting now for my little lego astronaut to arrive in the post...

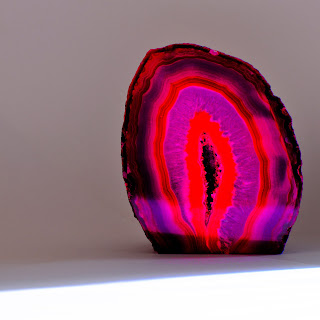
The second texture is the shiny flat plane of the geode. Again from reading Light, Science and Magic, I thought of trying the technique illustrated in figure 4.27 on page 81 - a combination of diffused light with a gobo to create contrast on the surface - but I did wonder what would happen if I shined a light directly on the surface; then the shot happened by accident. I woke up one morning to find that the natural light with the geode placed next to the window created an intense shine, so I grabbed the opportunity to use that without any additional lighting. See Texture 2.

The crystalline texture would be hard to capture as it was quite far inside the geode, but I could try to shine a diffused light into the hollow at an angle and take the picture from the opposite angle. In practice this didn't work, but I found a variation using a combination of the table spot light and the LED headlamp shining right into the centre of the geode and then using a macro lens to get in as far as I could. This was tricky though, as I found in processing that there was a lot of noise, because I had the ISO set at 2000, which didn't allow me to convert easily into a jpeg for uploading. So I had to reshoot with the camera set to JPEG and lowered the ISO to 400. I was also half a stop under exposed to compensate for the glare from the crystals. See Texture 3.

Anyway, toys back in the pram, I started to think about what I could use. I had a look at other students' blogs and saw a variety of subjects had been used including a teddy bear, a garden light, a mask, a nodding Churchill dog and a pig's head. Looking at these, helped me think about what I could use as an object.
My initial thought was to use a skull - it would have an interesting form, texture, and shape - I figured I could create some interesting effects with the eyes, and I would see if I could bring out any colour other than white. So I looked on ebay for a skull, and found I could buy a real human skull for about £250. This freaked me out......
I then thought about photographing my friend's stick insect called "Stump" - he ticked all the boxes - shape, form, texture, colour - and I had visions of macro photos, with shadows of legs reflected. In practise, the trial shots were fraught with difficulty: Stump would not keep still for one thing (aren't stick insects suppposed to pretend to be sticks?) and he kept marching towards me, which viewed through a macro lens was a little disturbing!

The other difficulty was the lighting. Stump was quite dark, as was the stick he was balancing on. Each time I tried to shine a light on him to get some shadow and contrast he walked off....

So I abandoned Stump, and turned to my friend's other pet, Harry. With Harry, I had the opposite problem: he kept turning around away from me and running into a corner squeaking. I was trying to use a fish-eye to enhance his lovely round form, but he didn't like it.

So, my next idea was a brightly coloured agate geode I saw in a shop in Keswick (why in Keswick - don't these belong in Dorset??). If couldn't go to the mountain, I would bring the mountain to me! So I bought my geode and started to think about what I could do with it. It has shape, form, colour, and texture - three different kinds of texture in fact - so hopefully this will serve me well.
Here is my trial shot with a single lamp from the side, showing its basic shape:

So object now chosen, I then started to think about what I needed to do to achieve the four criteria, using my knowledge gained from the coursework, what I had found out reading Light, Science & Magic by Hunter, Biver and Fuqua, and some other gems of inspiration gained from attending exhibitions and reading "Photography Monthly". At this point, having prevoiusly not wanted to do a still life set up, I was so motivated by my ideas, that I started shooting for the assignment, before I had finished all the exercises for section four!
Shape
My trial shot shows the basic shape quite well, so I decided to retain this idea, particularly as the flame-shape is replicated in the pattern of the agate. I also liked the shadow and the line of the white wall and the white table top, so remembering Ill Form and Void Full, I thought I would reshoot this, perhaps angle the geode slightly to create a bulky shape and try to create something similar using some paper to create some confusing planes (not sure that bit worked very well, but I did try......) and contrast between straight lines and the flame-shape of the geode - maybe I could exagerate the effect by using a wide-angled lens close up?? Would the shape be improved by using monochrome also?
After trying several options including using overhead lighting to eliminate shadow, I used a shot taken with a macro lens, enabling me to get close to the pattern, and naked side lighting, which created a matt surface, and converted the image to monochrome to remove the colour distraction. The shadow to the left side was surprisingly soft in the final version so I felt this was ok to leave in, as it added some slight anchoring and created a better image than the overhead lighting. After converting it to monochrome, I changed it back to colour, as in the end I preferred the colour version. See Shape 1.

I also wondered if I could create the effect of shape by using some backlighting; I wanted to see if I could create a silhoutte by putting a candle behind the geode and shooting the flat plane in darkness - perhaps using a tripod and remote control. In the end, I created a dark wigwam out of black card and shot handheld using a prime lens and underexposed by four stops and then three stops.

However, I wasn't entirely happy with these images. The light behind the rock wasn't strong enough to produce the desired silhoutte.


After thinking about this overnight, the next day was blessed with beautiful sunlight. So I placed the geode on the window sill, making the most of the sunlight (yes should have been out walking......) and using my prime lens, narrowed up the aperture to f/22 and underexposed by one stop. This exposure brought out the background detail and strengthened the colour in the background. See Shape 2.
Form
Because the geode has a flat plane, I imagined the best way to capture form would be to position the geode at an angle to the camera and to try using three-quarters raised lighting to try to capture the longest distance to the back of the geode and to see if I could extend the shadow beyond this point - so the light would have to be pointing towards the back of the geode.
I also thought I would convert to monochrome to get the full effect of form like I did with my image of Fleetwith Pike below taken last year:

Here is my set up for my first form shot showing a set up between three-quarters angled and over head lighting. In the end, I placed the geode flat plane down to make the most out of the curved body of the stone and converted to black and white to eliminate the distraction of colour. See Form 1.

My second attempt at a form shot happened by accident. I noticed that the sun was quite strong through my bedroom window so I placed my geode on the laundry basket and tried to capture some edge lighting using spot metering and under exposing. I was successful in getting the lighting around the form of the geode, but not in the execution of the photo; I was set to a very wide aperture and the camera focussed on the wicker not the geode...

This did however spark a new idea, which involved rolling around on my bedroom floor (much to the amusement of my dogs), moving my geode around trying to capture the sunlight in various places and underexposing by four stops and using the narrowest aperture possible, which got some pleasing results.
Here is one of my experimental shots:

But, see the final photograph: Shape, Form, Texture and Colour, for the version submitted.
Colour
As I had three textures to consider with the geode, and only one good colour - bright magenta - I considered various options for colour, but would decide afterwards which one had worked the best
My first thought was to try to create some bright pink bokeh making the most of the shiny surface. Remembering Creative Digital Photography by Chris Gatcum, I checked how to do this: wide aperture (can use my prime lens for this) and close camera, but for bokeh you need the light to be in the background and the geode would then block the light out....I figured I would try shining a light directly at the face of the geode and to see what happened - perhaps with the camera close up and a very wide aperture something interesting would happen...if that didn't work, I could also try a zoom burst - remembering that this is about light rather than gimmicks, I would be careful to make sure the light/exposure would render the colour as pink as possible. I knew from previous work on colour that slightly overexposing made the colour seem brighter to a point, and that under exposing would create stronger colours, but that I got the most accurate results by average exposure. I figured that perhaps half a stop over exposed would perhaps produce a good pink.
My other option for emphasing colour could be to vary the background. Again, using face on lighting to reflect as much pink as possible, I could use a black or white background to create absolute contrast, or use the opposite colour on the colour wheel for light - a sort of lime green would create contrast. I have a green "post-it" pad that would do the trick. Again - remembering that the exercise is about light, recalled the exercise on softening the light produced more even and brighter colour with diffused lighting and that from the lighting angle exercise, the better colours were produced from a high light pointing down.
Incidentally, something interesting happened when I was experimenting with the colour saturation on my software; I would really like to have used this but I cannot attribute this effect to lighting....:

I experimented for a while with zoom bursts and trying to place lighting behind the geode to get some pink lighting that would produce bokeh, but it was quite obvious very quickly that this wouldn't work; so I went back to trying to create the best pink using my lighting. The first shot I tried for my colour image was against some green "post-it" notes to achieve colour contrast, with the geode facing sideways to the window; I didn't like this image at all - it's too harsh and there is a black halo effect on one side.

My second attempt was much more successful. I wanted a bold colour, so I abandoned the diffused lighting idea and placed the spot table light directly in front of the geode with the light shining as high as possible in the face of the geode - to the naked eye this seemed to bring out the most of the colour. I underexposed the image by one stop to deepen the colours and changed the white balance to "lightbulb setting" to bring a bluer effect. I think the blue tint with the shadow provides a softer and more pleasing contrast than the harsh green. See Colour 1.

I also noticed that with the lights at certain angles, the little crystals inside the geode reflected pink light, however, as this shot is very similar to my texture shot, I decided against using it.


Texture
My geode has three textures, rough, smooth, and crystalline, so I wanted to use three of the eight photo options here, particularly as I only needed one for colour. With all options I would use a macro lens to really get the most out of the texture.
The body of the geode is rough like pumice stone and a pale mauvish pink. I knew from reading Light, Science and Magic that to get texture out of a paler surface you need a small light at a low angle to reveal texture, but I also wondered what would happen if I photographed the geode outside in the snow (unusual for March), hoping that the snow would reflect light at different angles, and added some little people to create the effect of climbers on a rock........

So, Sunday morning, nice light with moving clouds. light not too harsh, a trial shot indoors:

and off we went outside; only to find out that this was FRAUGHT WITH DANGER. For a start, the snow made the geode wet, and the geode made the snow pink, so this was not helping. Secondly my little people kept blowing off; one of which got lost in the snow and took a while to find :(
I did manage to get some texture though - you can see shading in the bigger holes - but this is helped enormously by the macro lens and the ability to shoot close up.

So, back inside the safety of the house, I had to rethink how I would set up the shot. I then remembered a photo I had previously taken of Derwent Water, when I was trying to learn misty water and negative space, and thought, that although the image hadn't worked very well in printing (overblown reflections), it would make a nice background for my scene.

I then positioned my geode and people in place and took a trial shot with the little people, while I was waiting for the geode to dry out.

Happy now that my idea would work, I set the shot up with side lighting trying different combinations of tabletop spotlight and an LED headlamp held in different places. I also knew from the trial shot that I needed to use a narrower aperture. This did however turn out to be harder than I thought. I found that to get texture in the bigger holes, I had to sacrifice texture across the surface, and vice versa. 138 pictures later... I finally settled on f/32, 4s and ISO 200 using a tripod with just the LED light held at about 45 degrees with the camera face on. See Texture 1.
This then spawned a further idea for a "most imaginative" competition coming up later in the year....just waiting now for my little lego astronaut to arrive in the post...

The second texture is the shiny flat plane of the geode. Again from reading Light, Science and Magic, I thought of trying the technique illustrated in figure 4.27 on page 81 - a combination of diffused light with a gobo to create contrast on the surface - but I did wonder what would happen if I shined a light directly on the surface; then the shot happened by accident. I woke up one morning to find that the natural light with the geode placed next to the window created an intense shine, so I grabbed the opportunity to use that without any additional lighting. See Texture 2.

The crystalline texture would be hard to capture as it was quite far inside the geode, but I could try to shine a diffused light into the hollow at an angle and take the picture from the opposite angle. In practice this didn't work, but I found a variation using a combination of the table spot light and the LED headlamp shining right into the centre of the geode and then using a macro lens to get in as far as I could. This was tricky though, as I found in processing that there was a lot of noise, because I had the ISO set at 2000, which didn't allow me to convert easily into a jpeg for uploading. So I had to reshoot with the camera set to JPEG and lowered the ISO to 400. I was also half a stop under exposed to compensate for the glare from the crystals. See Texture 3.

Outdoors at night 3
Now obsessed with outdoors at night photography....and it's even better in the rain!


Subscribe to:
Posts (Atom)